
Correct exposure is important for objective imaging, but can be difficult to achieve. Over-exposure will result in the brightest pixels in the image being “clipped” or “saturated”. As pixels become brighter they reach this level and cannot go any higher, which is a big problem for objective photography as it will result in false data being produced. Any pixels that have reached saturation point should not be measured. Under-exposure results in higher levels of noise, reducing the effective dynamic range of the image (so dark things just look black, rather than a range of low values). When generating mspec images the tools highlight any pixels which are over-exposed.
Getting well-exposed photographs is therefore essential. As a simple rule, you should use images with exposures which are a high as possible without quite reaching the top of the range.
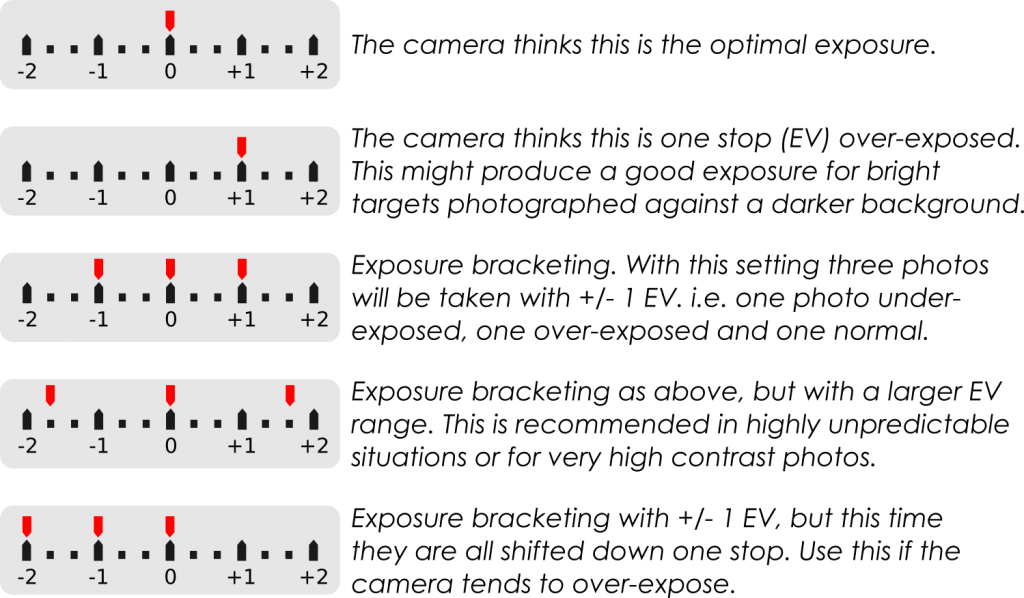
Using exposure compensation and exposure bracketing is recommended to ensure that photographs of the ideal exposure are created. Almost all DSLRs provide this function, and many phone camera apps do too (Open Camera is recommended for Android). The bottom setting in the above image is recommended for most cameras and scenes, though will vary hugely on camera and scene properties.
Most digital cameras provide on-screen histograms and these are very useful for judging whether a photo is over-exposed as you take the photos (though they cannot be relied on entirely because they use non-linear levels and are often conservative). Ideally, separate red, green and blue histograms should be used, but some cameras only provide a grey-scale histogram. Single grey-level histograms can be less reliable for UV photography. If the grey values are calculated as the average of RGB this will under-estimate the pixel levels because the green channel is not sensitive to UV, while the red is most sensitive, meaning the red could be saturated. Nevertheless, once you have become accustomed to your camera’s histogram performance it is a very useful tool for judging exposure.
The recommended camera mode depends on conditions. In fixed lab conditions where lighting intensity will not fluctuate substantially the best solution is to use “M” (full manual aperture and shutter speed control), and spend some time working out the best settings, then use those settings for the whole experiment. Note that any changes in the position or intensity of the light source will likely affect these settings, so check histograms regularly. Some cameras do a very good job of calculating the optimal exposure, in which case “A” mode (aperture priority) can be used. In this mode you set the aperture to use (which should remain fixed across the whole study), and the camera automatically decides on the best shutter speed. You can then alter the exposure value (“EV” or “+/-” symbol on most cameras), telling the camera to under- or over-expose the photo by a set number of exposure values compared to what the camera thinks is best. For example, if you are photographing something against a dark background the camera will generally try to over-expose, so selecting EV-1 will tell the camera to under-expose slightly. DSLR cameras tend to be good at working out the optimal exposure in visible wavelengths, but are poor at working out UV exposures, so manual control (M) is recommended for UV photography. Mirrorless cameras (such as the Samsung NX1000) tend to do a better job in UV as their exposures are based on the light hitting the sensor rather than dedicated light meters, so can often be used in aperture priority mode. In either case though it is often possible to use the exposure values as references that will vary between camera models and will require some experimentation to get used to.