
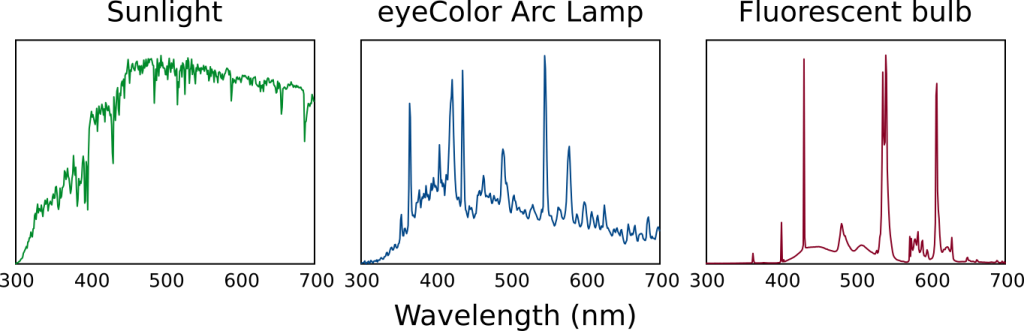
Photography is entirely dependant on light and the way it bounces off or through objects, so is an important consideration before starting data collection. In an ideal world, all photographs that you want to compare should be taken under uniform lighting conditions, however in practice this can be impossible to achieve. The emission spectrum of a light source affects colour reproduction, which can generally be controlled for by using a grey standard (see below). However, some emission spectra are so “spikey” that the spikes can interact with reflectance spectra in ways that cannot be controlled for with a grey standard (e.g. causing metamerism). Fluorescent light sources (energy saving bulbs, tube lights etc.) are the worst and should be avoided if at all possible. Flickering can also be problematic. If your photographs have odd looking horizontal banding this is caused by a flickering light source and a much longer exposure (shutter speed) should be used to eliminate this effect if no other source is available. Also be aware that many artificial light sources change their spectra as they warm up (over a few minutes), could change with voltage fluctuations in the mains or battery supply, and can change as the bulb ages. So always try to get a grey standard into each photograph if possible rather than relying on the sequential method (taking a photograph of the standard before or after the target has been photographed).
The light source you use must cover the entire range of wavelengths you are photographing, it is not acceptable to use two or more light sources with different emission spectra to cover the whole range you are interested in unless these light sources can be blended together effectively (which is not trivial). For example, using one light source that emits human-visible light should not be combined with a second light to add the UV component. This is because the lights will interact with the 3D surface angles of the target, making some regions appear to have colours that they do not.
The Iwasaki eyeColour MT70D E27 6500K arc lamp available from CP-lighting (www.cp-lighting.co.uk) can be converted into a good UV-visible band light source by removing its UV/IR protective filter. The filter is just visible as an oily rainbow effect when the bulb is held up to the light. By using a hand-held drill with a steel wire circular brush this filter can be removed without damaging the glass to increase the UVA emissions of this bulb. Sensible precautions and protective equipment (goggles and gloves) should be worn when doing this. The bulb’s emissions in the UVA range are increased by this process, so eye and skin protection must be worn when working near this light source for long periods, and it will fade nearby colours faster. Being an arc lamp this bulb needs to be operated by a suitable ballast (also available from CP-lighting). Photography stands that have an E27 socket can also readily be used with this bulb. Consult an electrician to wire this system together if you are not confident in doing it yourself.
Alternative visible-UV light sources are lamps designed for vivariums, e.g. arc lamps or mercury vapour lamps. A good example might be the Exo-Terra Sunray lamp.