
Acuity correction is an important step in modelling receiver vision, and in the QCPA framework, controlling for the receiver’s spatial acuity, and the viewing distance. This method uses a Gaussian convolution to eliminate spatial information from an image to simulate the spatial acuity of a given receiver. The principal is identical to AcuityView, however the processing methods are quite different. AcuityView uses fast Fourier transforms (FFT) to apply the modulation transfer function (i.e. blur the image), and these methods can only be applied to rectangular images. It is often necessary to measure specific (non-rectangular) parts of an image independently of their background (e.g. a butterfly in a museum case, where you don’t want to measure the background at all). Under these circumstances FFT-based methods, and even methods using standard “Gaussian filters” (such as those used by MATLAB, Photoshop and base ImageJ) are inappropriate because they use a more computationally efficient separable convolution function, which require rectangular image selections.
We therefore wrote our own 2D Gaussian convolution function which can be applied to ROIs of any size and shape, to blur images appropriately independently of their backgrounds. The method is therefore less computationally efficient than alternatives, however the tools pre-scale the images to a suitable number of pixels per minimum-resolvable-angle (MRA) so that in practice this step is unlikely to take more than a few seconds for a typical image.
For convenience we have compiled a list of animal spatial acuities.
Which acuity control method should I use?
If you will only ever be measuring entire (rectangular) images, and want the fastest possible processing speeds then use the AcuityView method. If you will be measuring (non-rectangular) image sections independently of their surrounding pixels, then use the Gaussian Acuity Control. If you will be comparing whole (rectangular) image sections to non-rectangular sub-sections, then also use Gaussian Acuity Control for all image processing (to keep the processing steps consistent).
Input Requirements
The Gaussian acuity control works on any 32-bit stack (e.g. normalised, linear reflectance image, or cone-catch image). You must also know the spatial acuity of the visual system you’re modelling (see the tables of acuity values here), and the angular width of the image or the simulated viewing distance (in which case you also need a scale bar in the image).
Running Gaussian Acuity Control
Ensure the correct image is selected. You can either run this on its own (plugins > micaToolbox > QCPA > Gaussian Acuity Control), or as an option in the QCPA framework (plugins > micaToolbox > QCPA > Run QCPA Framework, and selecting “Gaussian Acuity Control” from the options).
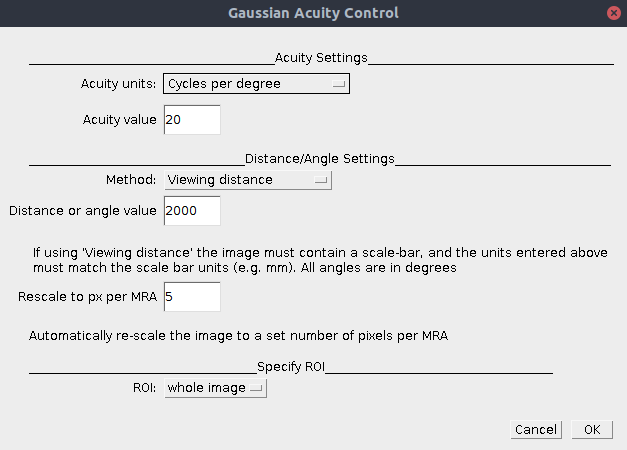
| Acuity Units | Select either “cycles per degree” or “minimum resolvable angle” depending on which is more convenient (acuity = 1/MRA) |
| Acuity Value | The number of cycles per degree, or MRA of the visual system (depending on which units you’ve selected above). See the list of animal spatial acuities. |
| Method | Viewing Distance: Acuity is calculated from a combination of the known distance to the image plane, and the width of that plane. If this is selected the image must contain a scale bar (created by drawing a line selection along a scale bar visible in an mspec image and pressing “S”). Angular Width of Image: Select if you don’t know the scale in the image, but do know the angular width of the image (this will depend on the lens/zoom factor, sensor size, and whether any image cropping has been used. In general this is less likely to be useful. |
| Distance or Angle Value | Add the respective distance or image angular width. If “viewing distance” is chosen above the units used here must match the units used in the scale bar. We recommend using millimetres for all distance measurements as default to avoid confusion. If “Angular width” is chosen above then the units here are degrees. |
| Rescale to px per MRA | This option rescales the output image to uniform number of pixels per minimum resolvable angle. This is convenient for a number of reasons, as it reduces the image dimensions without loss of spatial information. It also speeds up image processing significantly, and ensures all images not only have the same level of spatial information, but have the same effective resolution (i.e. it will make various types of pattern or image analysis more consistent). We recommend 5 px/MRA, more than this is unnecessary, any less could cause loss of spatial information. Set to zero to turn off this feature. |
| ROI | This method can be applied to the entire image, or just a single ROI. Unlike almost all other methods for blurring images, this tool can blur ROIs completely independently of their surrounding pixels. Select the desired ROI to process here. |
Output
A new image stack will be produced where each slice/channel in the input image has undergone the same level blurring and rescaling appropriate to the acuity of the selected visual system. Contrast at the spatial scale of the MRA will now be reduced to 2% of the original amplitude.