
By default the micaToolbox uses linear 32-bit images because these are required for visual modelling. However, it is often useful to turn these images into images compatible with human colour vision and typical display equipment, requiring non-linear images. If you simply find the image too dark to see certain details, see display brightness.
To create a presentation image, select a 32-bit (e.g. cone-catch) image stack, and run:
plugins > micaToolbox > Image Visualisation > Make Presentation Image
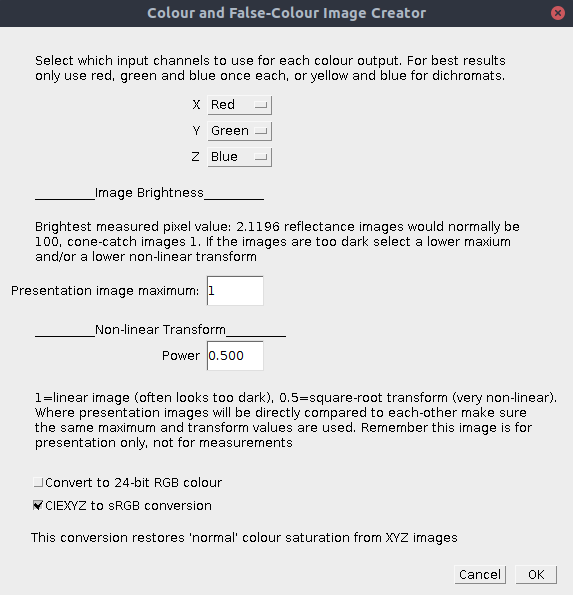
The dialogue box will show the names of the cone-catch channels available to use (typically three for a trichromat, four for a tetrachromat etc…). You can then choose what colour (in colloquial human terms) should be associated with each cone-catch channel. Recommended settings follow the simple rule that the order should match human wavelength ordering from longwave to shortware, e.g.:
Dichromat: Choose yellow for the MW or LW channel, and blue for the SW channel.
Trichromat: Choose red, green and blue in place of LW, MW and SW respectively. For bees, we recommend shifting everything down one, so red, green and blue are selected for MW, SW, & UV.
Tetrachromat: There is no way to create a fourth colour dimension without sacrificing either colour or pattern. We therefore recommend using two illustrative images. First, a human-visible-range only image. e.g. avian LW, MW and SW given red, green and blue respectively. Then a second image to illustrate the UV channel. One option is to show MW, SW and UV in place of red, green and blue. Alternatively, the contribution of UV is most clear in an image where SW is compared to UV alone. So SW is yellow and UV is blue. We do not recommend showing any of the channels on their own as greyscale, because this is makes the colour (chromatic) differences difficult to interpret above the dramatic luminance level variation.
| Presentation image maximum | Specifies the maximum brightness of the image. Typically this is 1 for a cone-catch image, or 100 for a reflectance image. However, in natural scenes it is common for lower values to be desirable. Note that this maximum value scales automatically with the power function chosen below. |
| Power | Linear images are typically extremely dark (our visual systems are much better at distinguishing below-average luminance levels than brighter values). To leave the image as linear set this value to 1. For non-linear images choose lower values than one. For example 0.5 will apply a square-root. sRGB gamma curves use 1/2.4, which is a value of around 0.42. |
| Convert to 24-bit RGB colour | By default a 32-bit colour image is created 9which you can save as a JPG or PNG image to automatically convert to 24-bit RGB). However this function lets you apply that automatically. |
| CIEXYZ to sRGB conversion | Human LW and MW cone sensitivities overlap substantially, so presenting LMS as raw RGB creates very poor colour reproduction in the red-green region. This function fixes this by applying a matrix transform, converting from CIEXYZ colour space to sRGB colour space. sRGB images should create “normal” colour reproduction, however for animals with better LW-MW separation this may lead to over-saturation of false colour images (because their colour gamut is larger than ours). |
Batch processing can be used to process an entire directory full of mspec images:
plugins > micaToolbox > Image Visualisation > Batch Make Presentation Image